Near Image Replicas
Welcome to Generative, a digital art blog where we create and analyze generative art techniques. As an introduction to the world of computer-generated images, let’s first talk about something a bit easier to understand: digitally altered images.
You have almost certainly used digital editing software to enhance or change an image that you’ve taken on your phone. In this post, we’ll simply take an image and move around its pixels to create a visually perplexing effect called a Near Replica. Let’s get started.
Defining a Near Replica
A Near Replica is an image that is derived from a source image, and is changed such that it looks similar to the source, but none of the pixels are in their original place. We can take a picture, break it up into pieces, and reorganize those pieces so that tiles of a similar color swap places. The result is an image that, from afar, is recognizable as the source image, but upon further inspection is harshly different.
Creating a Near Replica
To create a replica:
- Select a source image, and choose number of tiles (n).
- Get pixel RGB values from original image.
- Break the source image up into (n x n) tiles.
- Obtain closest look-alike for all tiles.
- Place look-alike tiles on canvas where original tile would be.
- 🎉
Step By Step
First, let’s find a source image to make a replica from. I’m going to use this picture of an eyeball to demonstrate, since it has clear patterns and rotational symmetry.
We now need to get information about the colors in the image, namely the color values of each pixel. Luckily, we can use
the getImageData() canvas context method to do just that.
The tricky thing is that this method returns a 1D array, containing the red, green, blue, and alpha value for each pixel in order, going from top left to bottom right.
[255,
255
,255, 255,
255,
255,
255, 255,
255,
255,
255, 255,…]
Let’s map these values to an (n x n) array, where location (x, y) in the new array will give us the RGBA values for tile (x, y) in the original image.
function getTileData(data: number[], row: number, col: number, n: number) {
  // From a 1D array of RGBA values (data)
  // Return a "tile" of this data
  // using x, y coordinates (row, col)
  // where data is split into n tiles

  // Tile width & Tile height
  const tw = Math.round(img.width / n)
  const th = Math.round(img.height / n)

  // Our row delimeter, or the number of bits required to move
  // down 'th' rows.
  const rowDelim = data.length / n

  // The total number of bits in our tile.
  const numBits = 4 * tw * th

  // The total number of bits per row.
  const bitsPerRow = 4 * tw

  // Offset is the index that we start counting from in
  // our 1D array.
  // It takes row * rowDelim pixels to move down 'row' steps
  // on our grid and 4 * tw pixels to move across 'col' steps.
  let offset = row * rowDelim + 4 * tw * col
  // New array to contain RGBA values for our tile.
  let dataArr = []

  // Add each value one by one into our new array
  for (let i = 0; i < numBits; i++) {
    dataArr.push(data[offset + i])
    if (i % bitsPerRow === 0 && i > 0) {
      // If we have hit the end of the row, shift down
      // to new row.

      // Move forward (n - 1) rows, such that
      // we end up back at the start of the next
      // row.
      offset += bitsPerRow * (n - 1)
    }
  }

  return dataArr
}
When we’re done, we will have a way of accessing color value data for each of our tiles.
Moving Tiles
Since we’ve split our image up into (n x n) tiles, we need a good way to move these tiles around. Luckily, it’s pretty easy to
do this with our HTMLCanvas. For this example, we’re going to split this image up into a 16 x 16 grid.
Hover your cursor over the image to shuffle the tiles around
Now that we know how to manipulate the location of our tiles on the canvas, we now need a way to find tiles that look similar to each other.
Finding a Look-Alike
If two tiles have roughly the same amount of red, green, and blue, they will look similar in overall color composition. Let’s transform tile color values to points in 3D space (r,g,b) => (x,y,z) as a way of organizing our tiles by color. An all black tile would go to (0, 0, 0), an all white tile would go to (255, 255, 255), etc.
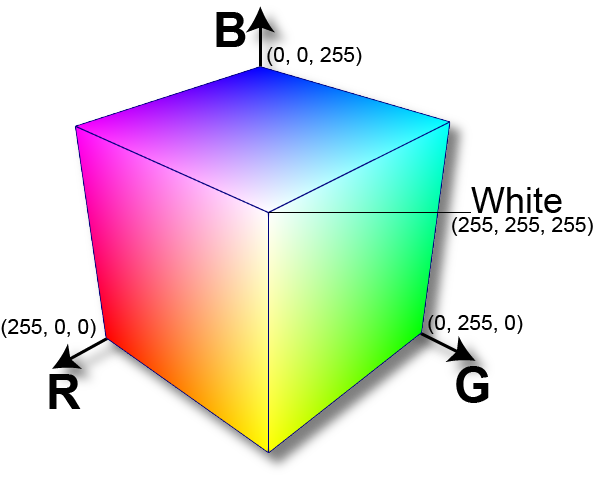
Intuitively, points that are close together in this color space correspond to tiles that have a similar color composition. Taking all tiles from an image and translating them to our color space, we can iterate over all points and find their nearest neighbor (most colorfully similar tile) using the formula for Euclidean Distance (Pythagorean Theorem).
function euclideanDistance(a: number[], b: number[]) {
  // Formula for Euclidean Distance
  // Returns the distance between two points
  // in n-D space.
  if (a.length !== b.length) {
    throw `Points do not have the same dimensions! (${a.length} !== ${b.length})`
  }
  let sum = 0
  for (let k = 0; k < a.length; k++) {
    sum += Math.pow(a[k] - b[k], 2)
  }
  return Math.sqrt(sum)
}
We can use this information to place the tiles in the location of their nearest look alike to obtain a Near Replica.
Putting It All Together
Below, you’ll find a near image replica for the eyeball in our example. Across Generative, we’ll be creating art right in your browser window. Aside from pre-loaded source images, all other images you see here did not exist until you clicked on this post.
So… why?
Near Image Replicas are the result of a question that I thought up while brainstorming for this blog: “What if you could create a visual game of telephone?”
The visual effect produced by this experiment is a beautiful one. An image that, at first glance, really conveys the same information as the source image while being almost entirely different.
Take a moment to appreciate the fragile location of every little pixel on your screen, even the ones that form this text. If they all decided to swap places at once, you might not even realize it.
Near Replicas Showcase
Here are some additional examples of Near Image Replicas. Feel free to play with the sliders beneath the images to see how the images change with varying values for n.
Notice how different values of n yield better or worse results. Why do you think that is? (hint: it has to do with the size of the source image!)
Make Your Own!
All of the code for Generative can be found here. But, you can upload your own image to convert into a Near Replica by clicking the button below.
Written and Created by Davis Keene
Further Reading
Near image replicas are best viewed from a distance. To learn more about why, this paper goes in-depth into how the human eye percieves objects differently as you move toward or away from it. The tl;dr is that your eyes detect lower spatial frequencies from afar, and higher spatial frequenices up close. Sharp edges and contours are less detectable as you move away, which adds to the illusion that the near replica is unaltered.